 |
 |
|
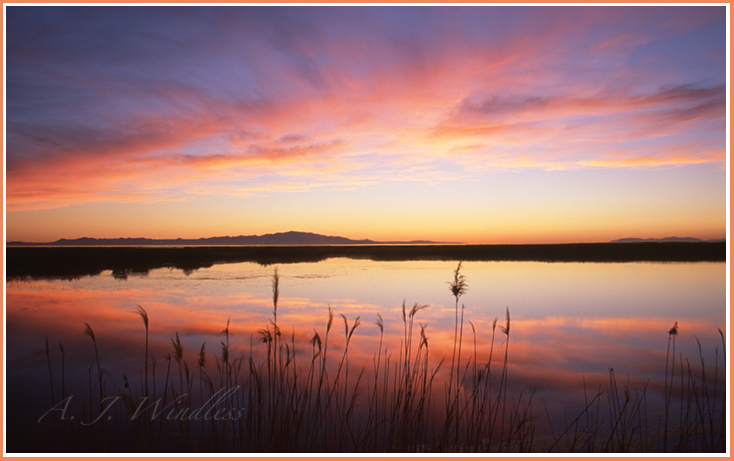
Double Lakes October 11, 1999 Film: Fujichrome 50 |
| How Do I Level My Photos? |
|
You might have noticed that you cannot see a reflection of
Antelope Island on the lake in front of us. If this were all one
body of water, I would expect to see Antelope Island mirrored in
the distance. Instead, what we see looks a little odd, because
the reflection only sees the brush close to the edge. The
reflection cannot jump over that brush to see the island in the
distance. To some, this photo might also look slightly tilted,
but it is level. Before releasing this photo, I put a guideline
along the distant shoreline and made sure it was perfectly
level. The rising piece of ground to the right, which cuts off
the distant reflection of light on the Great Salt Lake, may
create a slight optical illusion to some people. I was once at the Utah State Fair, when I heard a contestant ask why his picture only got third. He had a beautiful image of a reflective lake, and the judge told him that looking at the opposite shoreline, his photo was not level. The judge may have been a professional photographer, but probably made his living off of wedding photography or commercial photography, and didn't realize that what he said is not always true. If you can see the opposite shoreline well enough to see it curve, those curves may make it look like the photo is not level. The best way to level a reflective image is to find a tree top, a leaf, or a specific point in a cloud, preferrably near the center of the photo, and make sure that spot in the sky is perpendicular to the same spot in the refection. If you are using Photoshop you can use a "guideline". You can also hold a sheet of paper up to the screen, line it up on those points, and see if the piece of paper is parallel to the edges of the picture. You may wonder what to do if the image is level, but still doesn't look level. You are the artist, only you can decide, but most people will judge your photo on the way it looks to them. I see a lot of photos online, and I can tell most of them are photoshopped, and sometimes very unconvincingly. Most people who use Photoshop divide the picture at the horizon, and then flip it around and paste the same image on the bottom for the reflection. The reflection is not always a mirror image of what is above. As you can see in my photo here, there is no Antelope Island in the reflection, and you see the brush reflected in the water, but cannot see the plants in the dark shadows along the shoreline. Often the angle of view coming off the water will give you a different view of the subject. The clouds may look different if you are seeing them from a lower angle than if you look up from where your head is. And you may get more detail in the reflection because the sky gets more exposure and may wash out more. You can see in my photo that the reflected sky in the lower corners is much darker than the real sky high above. Most photographers will lighten the reflection up to match the sky, that is a personal choice. In this image I decided to leave the corners dark, often I do lighten up the reflection. As I compose my photos, I have little level bubbles on my tripod. I guess, those might be useful if you are standing on your head or something, and the photo looks level to you but is way off. But I have gotten my tripod all set up perfectly level on many occasions, and the image still doesn't look level, so much so, that I no longer bother with the level bubbles. My current camera, however, does have a level guideline on the monitor that I simply line up with the gridline. In post production, if you don't have something in the photo to line up with a guideline, go completely by "feel". Where does the image feel right? That is more important than a bubble or a guideline anyway. |